RSJ installation guide for extensions and renovations
A clear, homeowner-friendly guide to using RSJ steel beams safely in extensions and renovations.
A clear, homeowner-friendly guide to using RSJ steel beams safely in extensions and renovations.

Removing walls or opening up rooms is a great way to modernise a home, but it has to be done safely. RSJ steel beams sit at the heart of many extensions and renovations, quietly taking over the job of the walls and supports you remove.
RSJ stands for Rolled Steel Joist, although many people simply call it a steel beam. In domestic projects, an RSJ is used to carry loads that were previously supported by a wall, post or older timber beam.
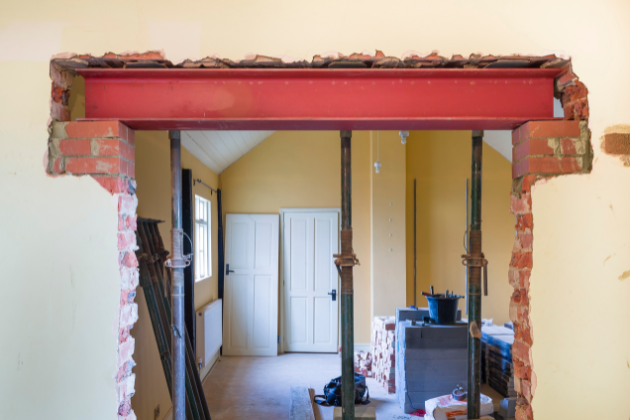
When you open up a space, the RSJ transfers the weight of floors, roofs and sometimes other walls down into new supports at each end. This allows you to enjoy an open-plan layout without compromising the structure of the building.
In many finished projects you will not see the RSJ at all, as it is usually hidden within the ceiling line or boxed in and plastered.
The size and position of an RSJ is not guessed on site. A qualified structural engineer calculates the loads, checks the existing structure and then specifies the correct beam size, bearings and padstones.
Your engineer will usually provide drawings and calculations that show:
Building control use these details to check compliance with regulations, and your builder uses them as a precise instruction manual for the installation.
Most RSJ installations for extensions and renovations follow a similar sequence, even though every house is different. Understanding the steps can make the process feel far less daunting.
The first step is a measured survey of the area, including walls, floors, roof structure and any visible supports. The structural engineer then designs the RSJ and supporting elements based on this information and your proposed layout.
Once the design is complete, your builder or designer usually submits the structural details to building control. Approval at this stage helps avoid delays or changes once work has started on site.
With drawings confirmed, your builder orders the RSJ from a steel fabricator. The beam may arrive with plates, end connections or bolt holes already made to match the engineer’s design.
Delivery and access are important. For tight sites, the builder may arrange for the beam to be delivered on a smaller vehicle, or in two sections that can be bolted together inside the property if needed.
Before any structural wall is removed, the area is carefully propped. Builders typically use strongboy attachments or needle beams and adjustable props to support the floor or roof above while the existing wall is cut out.
Correct sequencing is crucial. The builder will carefully install temporary supports to prevent any movement. If this step isn’t done properly, it can cause cracks, sagging, or even partial collapse. That’s why experienced tradespeople always prioritise this stage to keep your home safe.
An RSJ must sit on adequate bearings at each end, usually on a padstone or suitable masonry as specified by the engineer. The bearing spreads the load so the beam does not crush the support beneath it.
Once the wall section is removed and bearings are prepared, the beam is lifted into place. This can be done by hand with multiple operatives, with lifting equipment, or occasionally through a temporary opening from outside if access is tight.
The team then checks line and level, packs and grouts the bearings as required, and ties the new beam into the existing structure in line with the drawings.
Building regulations usually require structural steel to be protected to achieve a set fire resistance period. In domestic work, this is commonly achieved by boxing in the RSJ with fire-rated plasterboard and then plastering.
The beam can be hidden within a ceiling, expressed as a feature bulkhead, or integrated into a new stud wall. Once plastered and decorated, the steel work is virtually invisible but continues to do a critical job.
Having structural work done in a lived-in home can feel disruptive, but good planning can help everything run smoothly. It is worth talking through these practical points with your builder before work starts.
Expect some noise from cutting tools, drilling and breaking out masonry when the old wall is removed. There will also be short periods of higher activity when the beam is lifted into place.
Access routes are needed to bring materials and the RSJ into the property. In some cases, flooring may be temporarily lifted on the level above to allow propping or to fit the beam into the ceiling zone.
Structural alterations generate dust and rubble, but there are several ways to limit the impact on the rest of your home:
Moving or covering furniture and valuables before work starts makes it easier for the team to work efficiently and reduces the risk of accidental damage.
In almost all cases, yes. Installing an RSJ is a structural alteration that falls under building regulations. Building control will check the engineer’s design, may inspect the work during installation, and will provide certification on completion.
The structural work to install an RSJ is often completed within a few days, but the room may be out of normal use for longer while plastering, drying and any follow-on trades are finished. Your builder should give you a project-specific programme at the outset.
Your builder and engineer will usually need existing plans if available, details of your proposed layout, and access to roof spaces or neighbouring rooms to inspect the structure. Photos, sketches and clear notes about how you want the finished space to work are all helpful.
If you are planning an extension, open-plan layout or new openings, getting the RSJ design and installation right is essential for safety, comfort and long-term peace of mind. Working with an experienced team means the structural side of your project is handled carefully from start to finish.
To discuss structural changes for your home and learn how RSJs would be designed and installed for your project, visit the Renovations and Extensions pages at Construction Committed, or call 07805 635037 to talk through your ideas.
.jpeg)
.jpeg)